External Apps Tutorials
Padlet
Overview
Padlet is a web app that works like a digital bulletin board. Students and teachers may use padlet to share ideas and collaborate by posting notes, text, and images to the board. Teachers may use padlet for brainstorming activities, note-taking, exit tickets, card sorts, etc.. This tool may be used to support a variety of learning activities throughout the 5E sequence:
Engage/Opening
Explore/Learning Activity
Explain/Closing
Extend/Additional Learning Activity
Evaluate/Assessment
Procedure
Use the tabs below to learn how to create a Padlet and add it to a Canvas course. While Padlet allows a variety of sharing options, we recommend Embedding Padlets directly into Canvas.
Create a Padlet
Follow the steps below to create a new Padlet.
Login to Padlet. Visit Padlet.com and Log In.
If you have not created an account click the Sign up link to create an account OR Log in with an external app, such as Google or Microsoft.
If your school has purchased a subscription, use the Backpack/Briefcase Login link.
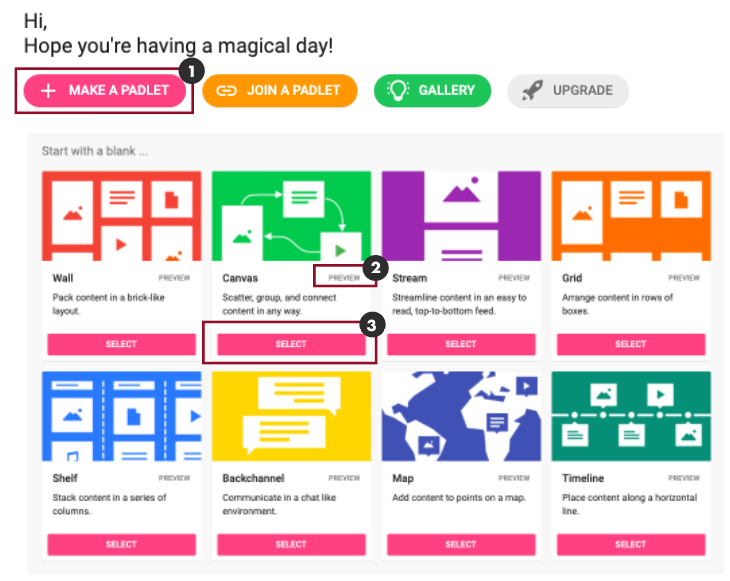
Make a Padlet. Click the + Make A Padlet button [1] to create a new padlet.
Note: Basic Padlet accounts are limited to three (3) Padlet boards.
Preview Layout. Click the Preview link to view the layout [2].
Choose a Layout. Padlet offers a variety of layouts that may be used to support interactive learning activities. Click the Select button on the desired layout to create a new Padlet [3].
Video Tutorial
Padlet Settings
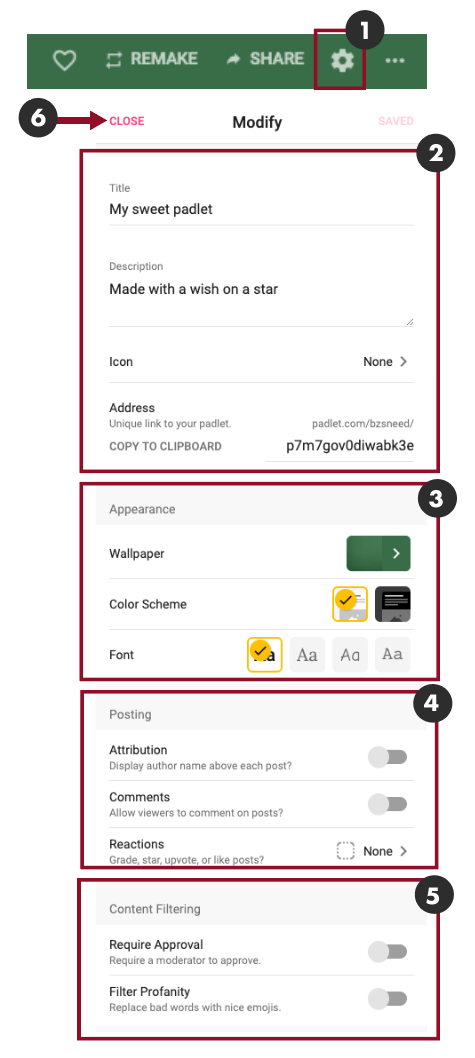
Settings. The settings will automatically appear when creating a new Padlet. To update settings on an existing Padlet, click the gear icon to open the Settings menu [1]. Customize the Padlet by changing the following settings:
Add or Modify Padlet Details [2].
Title. Add a Title for the Padlet.
Description. This may be used to provide instructions
Icon. Choose a custom icon to denote the Padlet
Address. This URL may be copied and shared for collaboration.
Appearance. Change the background, color scheme and font style [3].
Posting. Customize posting options [4].
Content Filtering. Allows for a moderator of the content and provides a profanity filter [5].
The profanity filter is disabled by default. It is recommended that this filter be enabled for unmoderated boards.
Save Settings. Click Next or Close the settings menu to save the settings. Click the Start Posting button to view the Padlet board [6].
Add Posts. Add a post by click the + Add button located at the bottom right corner of the Padlet board. Content may also be added to the board by double clicking anywhere in the Padlet, drag files in, copy and paste.

Padlet Recommended Posting Settings
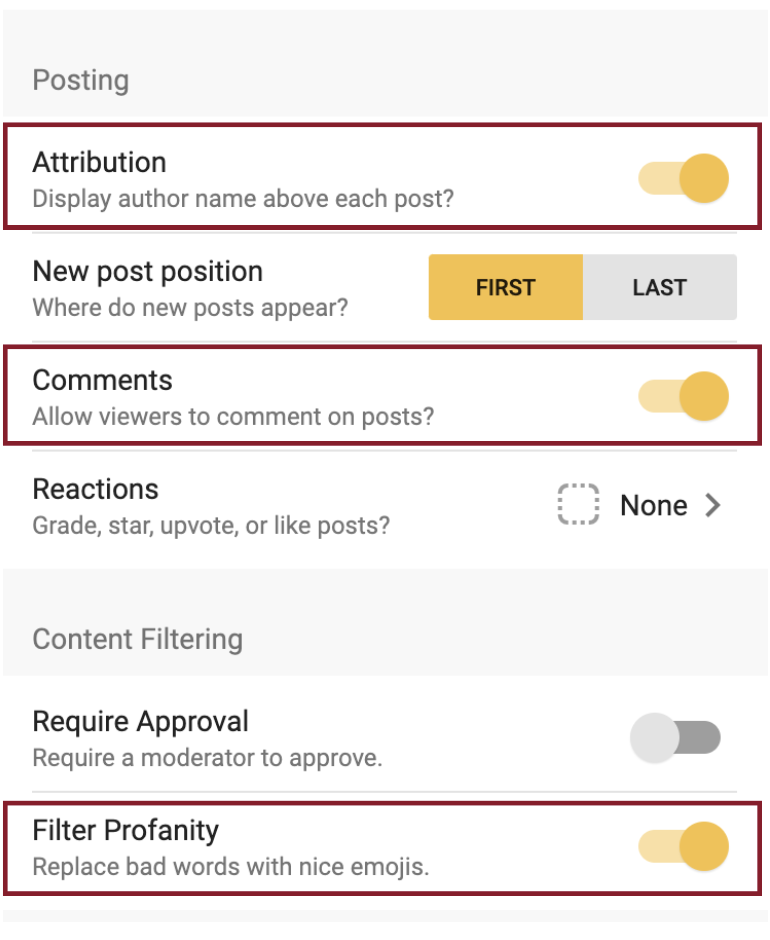
For online discussions, the following settings are recommended. Access the settings by clicking the gear icon located in the top right corner.
Attribution. Enable this option to have learner name automatically appear on posts. Note: This requires learners to create a Padlet account and be logged into Padlet. Learners may add posts without logging in, but the posts will be anonymous. Learners may add their name as the title of the post.
Comments. Enable the comments option to allow learners to add posts.
Filter Profanity. Enable this option to censor inappropriate language. Note: If learners will not be required to login, this may be helpful to prevent profanity.
Padlet Sharing Options
Once the Padlet has been created, it may be added to Canvas by sharing the URL with students.
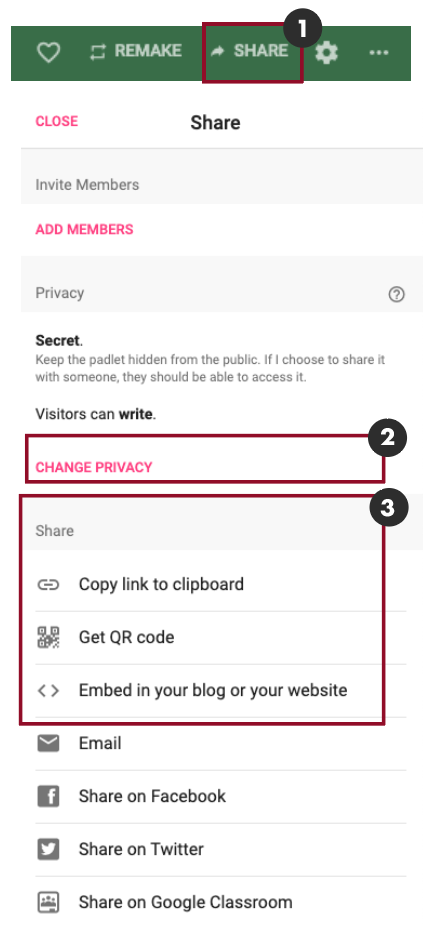
Sharing Options. Login to Padlet and navigate to the Padlet for the Canvas activity and open the Padlet. Click the Share link to view the Sharing Options [1].
Privacy. Click the Change Privacy link to select the desired privacy option. Select Visitor Permissions [2].
The Secret privacy option works best for sharing Padlets through Canvas.
Ensure that Visitor Permissions are set to Can Write if students are expected to contribute to the board.
Canvas Sharing Options [3]. Padlet offers a variety of sharing options, but the following options work best with Canvas:
Copy link to clipboard
Get QR code
< > Embed in your blog or your website
Share a Padlet in Canvas using a URL or a QR Code
A Padlet may be shared in Canvas by sharing a URL or a QR Code. Both may also be provided to increase access options.
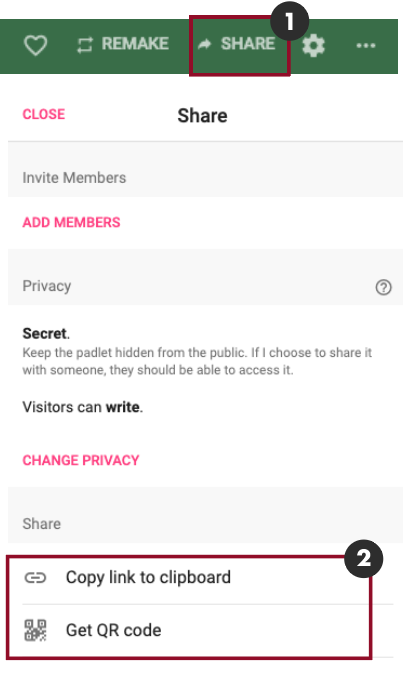
Open Sharing Options. Navigate to Padlet and open the Sharing Options [1].
Copy URL & QR Code [2]. Locate the Sharing Settings
Copy URL. Click the Copy link to clipboard link. The link will automatically be copied to the clipboard.
Download QR Code. Click the Get QR code link to create a QR code for the Padlet. A new window will appear. Click the Download link to save a copy of the QR Code.
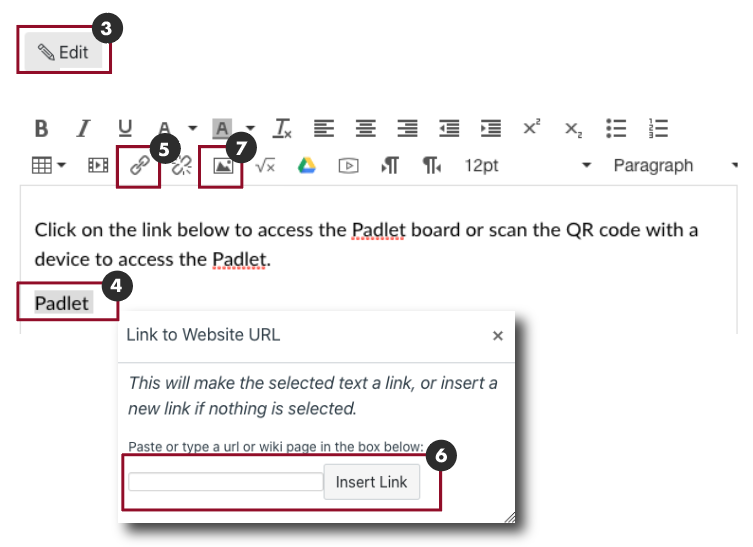
Edit Canvas Activity. Navigate to the Canvas Activity that will include the Padlet and click Edit [3].
Create a Shortened URL. Type a Title for the Padlet in the body of the activity [4]. Highlight the Title and click the Hyperlink icon [5] to add the URL. Paste the URL for the Padlet into the Link to Website URL dialog box and click the Insert Link button [6].
Add QR Code. Click the Add Image icon to insert the QR Code [7]. Add the image to the Canvas Files and insert the image into the body of the activity.
Save Changes. Scroll to the bottom of the Canvas activity and click the Save button to save changes.
Embed a Padlet in Canvas
Embedding a Padlet allows students to add posts to the Padlet without leaving Canvas. This is recommended as it creates a seamless learning experience.
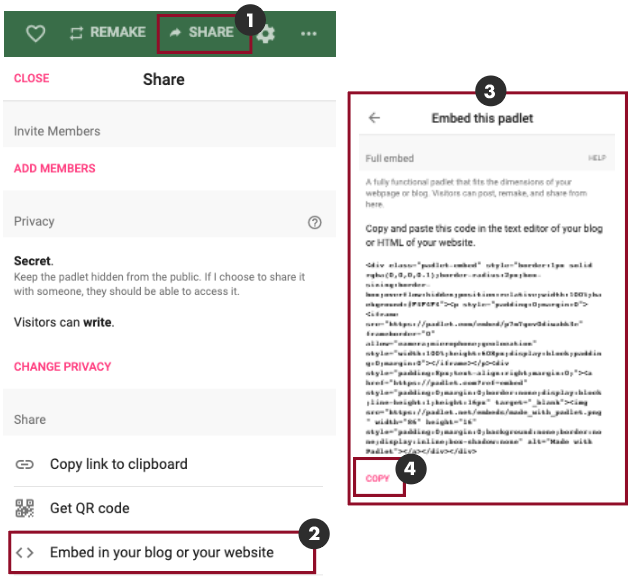
Open Sharing Options. Navigate to Padlet and open the Sharing Options [1].
Copy Embed Code. Click the Embed in your blog or your website link [2]. A new dialog box will appear and provide embed options. Under the Full Embed option [3], click Copy [4]. The code will automatically be copied to the clipboard.
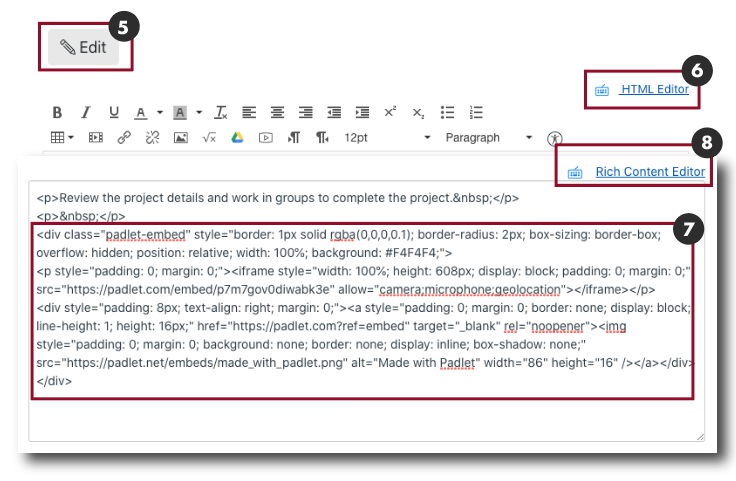
Insert Embed Code into Canvas. Navigate to the Canvas activity that will include the Padlet. Click the Edit button to edit the activity [5]. Click the HTML Editor link [6] and paste the embed code into the body of the activity [7].
View the Padlet. Click the Rich Content Editor link to view the Padlet [8]. The Padlet should appear in the body of the activity. Students should now be able to add posts through the Canvas activity.
